| Modeling/ Boolean Operations |
Boolean Operations
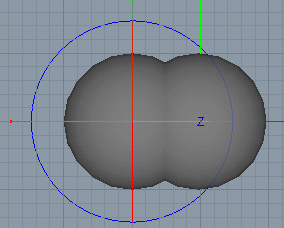
Boolean operations offer a very powerful way of creating and modifying objects. Consider a situation where an engineer cuts an object made of pine with a tool that has just been painted. Since the paint on the tool is still wet, it sticks on the object and the cut surface is 'painted' with the wet paint. The engineer notices this and replaces the tool with another clean tool. The new cut surface is clean showing the beautiful texture of the pine. The Boolean operations of Realsoft 3D work in a similar way. A simple example of a object created with a Boolean operation is a lens. A lens can be thought of as the intersection of two partially intersecting spheres. Tutorial level: Beginner Example project: 'tutorprojects/modeling/boolean/splitlens'
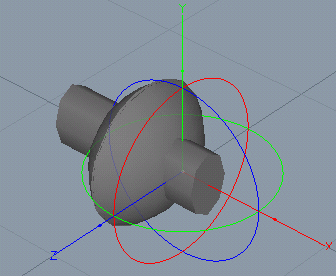
1. Create an analytic sphere using the Analytic Sphere tool. 2. Duplicate the sphere by holding down the Ctrl key while moving it so that the original and duplicated spheres are partially intersecting (you can also use Edit/Duplicate pull-down menu to duplicate an object).
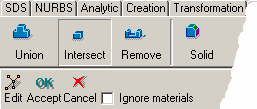
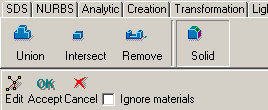
3. Multi select both spheres. As usual, this can be done by clicking the both spheres in the select window while holding down the Shift key. 4. Activate the Boolean tool (use the 'Boolean' tab of the toolbar).
5. The tool control bar shows you the Boolean operation specific options. Select the second operation, 'Intersect'.
6. Then click 'Accept'. The resulting object will be the part of the work piece that is inside the tool. It is a lens.
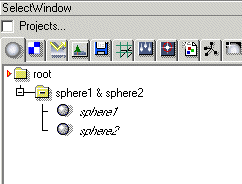
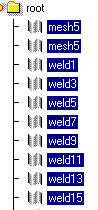
If you change the material of the lens to glass, it can be used as a magnifying glass! In the select window, you can see that the two objects have been replaced with a new level named 'sphere1 & sphere2'.
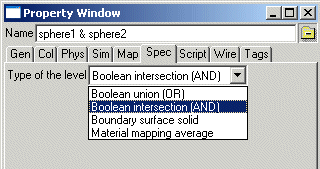
This reveals the nature of Boolean operations in Realsoft 3D: a Boolean operation is just a level object consisting of objects to be operated. The objects used in these operations can be complex ones with many levels of hierarchy, and they can contain objects that result from previous Boolean operations. This means that instead of using the procedure described above, you can also make Boolean operations 'manually'. When you create a new level, its type is set to union (OR). If you want to do intersection instead, open the property window and change the 'Type' field of the 'Spec' tab to 'Boolean Intersection'.
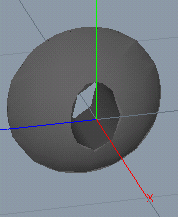
Note that the original Boolean operated objects (sphere1 and sphere2) can be modified after the operation just like any regular objects. You can even activate the 'Simulation' for the Boolean level and let gravity and other simulation effects to animate the sub objects. Let's continue experimenting with the lens object by cutting an oval hole through the lens. 7. Rename the created intersection level as 'Lens'. 8. Create an oval analytic cylinder passing through the lens object.
9. Select the lens and the cylinder object (in this order) and activate the Boolean operation tool again. A new object 'Lens & !cylinder' is created. Rename it as 'lens with a hole'.
Paint optionIn Realsoft 3D it is possible to execute the Boolean operations so that the tool affects not only the volume but also the surface of the object that it is operating on. This is a very useful feature. For example, if you cut a notch in a pine board using a 'shiny reflecting' (material attributes) tool and use 'Remove' operation with 'Paint' option, you get a 'shiny reflecting' notch on the board. Likewise, if you use a red tool you get a red notch. And if you use a chimney to cut a notch, you get a piece of wood with a notch of brick coating. On the other hand, if you use any of the non-painting operations, you get a clean notch of pine on your pine board (the wood texture of the pine board 'x-rays' right through the object so that you get a continuity of the texture). In this case the surface of the tool does not affect the object that is operated on. To test this feature: 10. Open the 'Lens with a hole' object by clicking its '+' handle in the select window. You can see that the level consists of two sub objects: the original complete lens and the cylinder representing the oval hole.
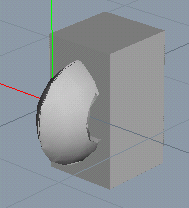
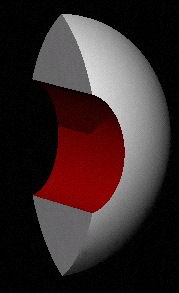
11. Select the oval hole object and open the property window. Go to the 'Col' tab and change the color of the cylinder to red (1 0 0). Click 'Render' and you will see a white lens with a red hole. You can disable this 'Paint' effect by clearing the 'Paint in Boolean Operations' option in the cylinders property window's 'Gen' tab. You can obtain the same results by setting the 'Ignore materials' option of the Boolean tool, instead of changing the attributes afterwards. Finally, we can make a section diagram of the lens by removing half of the lens using a cube object. 12. Create an analytic cube so that half of the lens is inside the cube.
13. Select the 'lens with a hole' and the cube. Then click the Boolean tool in the toolbar, set 'Intersection' option and click 'Accept'. If you have OpenGL switched on, the inaccurate polygonal representation might not look that beautiful. However, if you ray trace the view, you can see a perfect half of a lens with an oval red hole through it.
This is still a very simple object for Realsoft 3D. You can continue Boolean operations resulting in more complex shapes. They can be saved to disk and used in constructing other objects. As you complete useful new objects and tools, using the program becomes easier and faster.
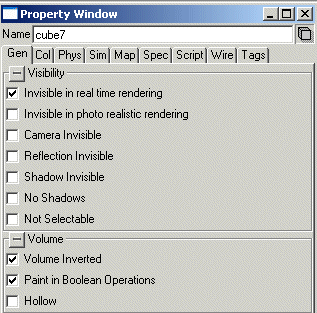
Inverting volumesWe created half of lens as an Intersection of the lens object and a cube. All parts of the lens outside the cube were removed. If we invert the Volume property of the cube, the operation will cut the part of the lens inside the cube. As a matter of fact, this is the way the 'Remove' Boolean operation works. 'Remove a cylinder from a lens' is the same operation as 'Intersect a Lens with an inverted cylinder'. To invert the volume of the cube, which cuts half of the lens: 14. Select the 'Cube' and open the property window. Go to the 'Gen' tab and set the 'Volume Inverted' checkbox.
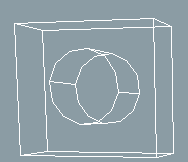
The previously removed half of the lens becomes now the result of the operation. Wireframes of BooleansReal-time visualization of a Boolean operation does not always show properly the true shape of the object. The reason for this is that the wireframe for a Boolean operation level is computed from wire frames of sub objects, and performing the operation often increases the quality requirements. Wire frame and shaded quality can be adjusted using the quality settings of the property window's 'Wire' tab. The automatic computation of Boolean wireframe is not always desirable. Turning Boolean wireframe computation off can increase the screen refresh rate and sometimes even give a better visual look. The next example demonstrates this. 1. Create an analytic cube and an analytic cylinder through it.
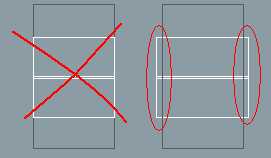
Objects for the Boolean operation 2. Now check an important thing: take a side view and make sure that the cylinder is long enough. The ends of the cylinder must stick out from the cube. If the objects are equally long, drilling with the cylinder will not succeed. Stretch the cylinder, using the blue rotation handle, if necessary to achieve this.
Verify that the 'drill' is long enough 3. Select the cube and then (with the Shift key held down) the cylinder. Activate the Boolean tool and select the third operation type 'Remove'. Click 'Accept'.
Insufficient Boolean wireframe All the parts of the cylinder wireframe outside the cube are cut away (because they do not belong to the resulting volume). This leaves very little wireframe left. Let's first adjust it by using the wireframe quality controls. 4. Open the hierarchy of the level 'cube & !cylinder' created by the Boolean operation from the select window. Select the cylinder. Open the property window and go to the 'Wire' tab. Change the 'Wire density' slider form the default value 1 to the value 5. Then select the parent level. Click 'AND wireframe off' button first on and then off to cause a refresh of the Boolean wireframe.
Cylinder wireframe density increased Now the denser wireframe clearly shows that a hole has been drilled through the cube. However, the original wireframes of the cube and the cylinder would give an elegant and beautiful representation of the operation (see the illustration of step1 above). To achieve this: 5. Select the cylinder again and drop the 'Wire density' value back to one. Then select its parent level and check the 'AND wireframe off' box. Now the object disappears from the view window. This happens, because the Boolean tool made sub objects invisible, so that they would not obscure the computed Boolean wireframe. Switch to the 'Gen' tab of the property window. Select both the cube and the cylinder, and clear the 'Invisible in real time rendering' box. The original wireframes appear again, which is what we wanted. Summary:
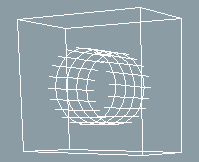
Boundary representation solidsIn the previous examples we used analytic sphere, cylinder and cube objects in Boolean operations. All analytic objects are very fast in Boolean operations because their interior volume is defined efficiently by a mathematical formula. However, it is also possible to use one or more surfaces, such as NURBS or subdivision meshes, to construct new solid objects. This kind of 'freeform' solids are defined using so called 'Boundary Representation Theory'. Solids defined this way can be used in Boolean operations the same way as analytic objects. To create a new solid object from a set of NURBS meshes: 1. Create and select any number of surfaces defining a closed volume. Note: closed volume means that it should not be possible to get inside the object without passing through a surface.
2. Activate the Boolean tool. Select the last operation 'Solid' and click 'Accept'.
This creates a new solid primitive from the selected surfaces. Now you can use this new level object similar to other solid objects. For example, to drill a hole through the new 'boundary' solid object: 3. Create an analytic cylinder through the object. 4. Select the level object and the cylinder (in this order) and activate the Boolean tool with 'Remove' option. The click 'Accept' and render the view to see the accurate result. Editing Boolean operationsWhen you execute a Boolean operation, the hierarchical structure of the object is modified to reflect the resulting object. If you move the lens object of the previous example, you notice that the hole faithfully follows the lens.
|


 |
 |